Showing posts with label Recipe. Show all posts

Friday, January 31, 2014

Creamy Tomato Soup Recipe. YUM.

If you can believe this.... I had never had tomato soup before 2011.  Like - never ever.  I'm not sure if it was because my dad isn't a big fan - or because my mom didn't like it.  No clue, but we never had it in our house growing up.  Probably because we would have turned up our noses at it, because we are so dumb.  For real.

Anyways, I'm not really a chef by any standards... but the tomato soup that follows is so yummy that I ate it for breakfast once this week and considered pouring it into a thermos on another day for the road.

So basically, it's good.

Ingredients

  • Small Onion
  • Couple of Carrots
  • Red Bell Pepper
  • Garlic (I totally use the diced garlic sold ready-to-go in the grocery store)
  • 1-2 T butter
  • Can of Chicken Broth
  • 2-3 large cans of tomatoes
  • Can of tomato paste (OPTIONAL)
  • Balsamic Vinegar
  • Dried Basil
  • Half-carton of heavy cream

Once you've gathered all of your ingredients, get to chopping.


Bonus points if your pepper and carrots are on their last legs.  This is the perfect dish for using up some overlooked veggies from a long week.


Chop chop chop.

I've used a food processor to just pulverize the heck out of them before, and I'm not sure I noticed any difference.  So - that's even easier!  Unfortunately, my new food processor is kinda iffy compared to the sturdy old model I used to have, so I haven't pulled it out much.

The other ingredients... 


I know some people are picky about their tomatoes... I'm just not.   I always waver over the "seasoned" vs just plain diced/petite diced tomatoes and have found no reason to commit to either.

So, I fire up my stove and heat a heavy-bottomed pan with the butter inside... and toss in the carrots to cook them down a bit.  Since they are the only crunchy thing in my recipe, I always give them extra time on the heat.


But after a couple minutes, add in the onion, garlic, and red pepper.  
 

Cook cook cook it down till the onions are nice and see-through.

And then - in goes the broth, tomatoes, and basil seasoning. 


The basil likes to float to the top for some reason, so I just give it a nice stir every 15 minutes or so.  

I'm not sure it matters how long you cook it, but I usually end up doing somewhere between an hour and two hours.  Turn it to medium-low (bubbling, but not going to burn the stuff on the bottom), throw the lid on, and wait wait wait.  Go watch a DIY show.  

And then we're back.

Somewhere in the midst of cooking, I decided it needed a little more punch - so I threw in a tablespoon of balsamic vinegar.  You could probably add more, but I was afraid.

And an hour or two later, you've got this bad boy.  And you are impatient, so you probably eat a small bowl of essentially warm tomatoes and veggies.  YUM.


I took mine off the stove for 10 minutes so it wasn't scalding - and then into the blender she went.  I don't have an immersion blender, but it honestly was no big deal in the regular blender.  I had 2 blender-pitchers full, so I just used another bowl as a temporary holding cell.


After that, you've got a delicious pot of tomato-y goodness.  And honestly, you COULD stop right here.  But you shouldn't because extra calories make the world go 'round.


Find your heavy cream in the fridge and throw a couple of tablespoons in.  I've heard horror stories of it curdling when it hits too-hot soup, so I'm always rushing to mix it in and not ruin things.


And then you've got it.  Creamy tomato soup perfection.  Better than Panera's, according to myself and my husband.  But he may be sleeping with the chef, so I'm not sure if he's lying or not.


Bonus points for adding copious amount of cheese and a grilled cheese sandwich to the mix.  And eating it in your robe on the couch at 7 pm.


Just living the dream, folks.

The tomato-y dream.

Now go make some soup.  Now. 

Tuesday, December 17, 2013

Red Velvet Dip

Otherwise known as "Honey, who shrunk my pants? Dip"

So, you need something quick and easy to throw together for a holiday party?  Don't worry, I've got you covered.

Here's what you need:

  • Red Velvet Boxed Cake Mix
  • 1 Brick Cream Cheese (I use the low fat version with no ill side effects.)
  • 1 Stick of Room-Temp Butter
  • 1/2 cup Powdered Sugar
  • 1/4 cup Brown Sugar (I've forgotten this ingredient before... didn't kill me).
  • Mini Chocolate Chips - usually 1/2 to a whole cup.
  • Nilla Wafers of Deliciousness

First, get that KitchenAid mixer going.  Cream cheese and butter, WHIP IT GOOD.


The thing about the butter and cream cheese is that, when refrigerated, they can get a little hard.  So a little extra air in the mix never hurt anybody!  Crank that mixer.

So when I read this receipe - I always get tripped up because it calls for 1.5 cups of red velvet cake mix.  Who knows what 1.5 cups of cake mix is?  Well, it's half a box.  If you're me, you'll just double the recipe and use the whole box.  Saves time!


After it's niiice and mixed up, don't be alarmed if your "red" velvet is slightly pasty looking.  Because there aren't any liquid ingredients, it actually takes several hours for the deeper red color to develop.  (The more you know!)

 I always add some mini chips to the mix so the chocolate chips aren't always on the outside.  If you're going for lazy, just throw them all in.  Some people bother to actually make the red velvet into a beautiful ball, but I usually just throw mine in a glass bowl and call it a day.


 Whatever you do, DO NOT buy the store brand chocolate chips.  They suck, melt weird, and are not good.  Name brand all the way.

If you're lazy, throw it in a bowl, chill (or not), and go to town.  Eat it with a spoon while sitting on the couch writing this post.  (Saves the calories of the Nilla Wafers!)


If you want to be fancy.... wrap the dough in saran wrap and chill in the fridge for 2+ hours until it's niiice and chilled, then roll in mini chips.

Apparently I don't have a pic of my pretty finished ball.  Needless to say, it didn't last long.

Bon appetit.  And watch your pants, they magically shrink when you make this stuff. WEIRD.

Add your sugars but not the red velvet yet.  It could turn into a murder scene in your kitchen, so delay as long as possible.


Wednesday, January 30, 2013

Wine Wednesday: Fancy Cupcake Edition

Last week, Mr. RH was fairly insistent that the only cupcakes worth eating were lemon-raspberry cupcakes.  Apparently MY favorite, white on white cupcakes, are not delicious enough.  Clearly he's mentally ill.

Anyways, it stuck in my head long enough that I knew I had to at least give them a try.  But I was scared, because stuffing a raspberry inside of a cupcake seems like quite the task. 

So, I googled around and found no satisfactory recipes... so I decided to wing it.

I baked a box of white cupcakes, easy peasy.

Then came the task of making the raspberry "sauce" for the inside of the cupcake.  I saw several variations of this stuffing, but they all seemed a little weird.

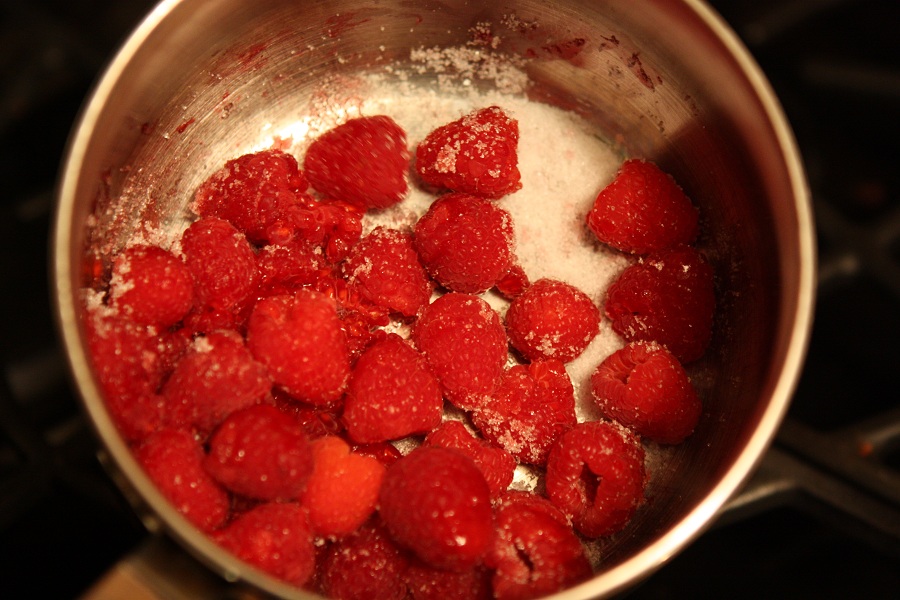
Basically, I heated the raspberries and maybe 3 tablespoons of white sugar on the stove.  My raspberries were pretty fresh so they didn't want to mush up.... so I used a potato masher on them.  Problem solved.


Eventually, they bubbled up and got all gooey and perfect.  I added a little bit (less than a teaspoon) of cornstarch to a little water and threw that into the mix to ensure it wouldn't be too runny and ruin my cupcakes.


 Next up was cutting a little reservoir in the center of the cupcakes.  I used my smallest paring knife and just dug a little cone out of each cupcake.  I realized halfway through that I was digging too deep and started to make them shallower.  You want to make sure your filling has some cupcake to soak into without breaking open.  


I had seen several people fill their cupcakes using a pastry bag, but I really thought that would leave too much raspberry goo in each cupcake.  Plus, I didn't know if my raspberry mix was thin enough for even a hefty pastry bag.

Enter... my oldest and cheapest teaspoon.  I just scooped a little bit into the spoon and pushed it into the cupcake.  I also tried to push the raspberry up around the edge of my little reservoir, again so it wouldn't soak through the bottom of the cake.


After this step, I deserved the wine.  As I told (whined to) Mr. RH, this stuffed cupcake business is hard!  And by hard I mean slightly more labor intensive than a regular cupcake.  I just wanted to put my feet up and watch Real Housewives, is that so much to ask?!


 The frosting is actually my favorite kind of frosting - a instant lemon pudding mixed with 1 cup cold milk, .25 cups powdered sugar, and a small tub of cool whip.  It's just THE perfect frosting - and you can use any flavor of pudding mix for variety.  Even though vanilla is obviously the best.
 
I actually managed to hold off eating one until this morning.  I don't even know who I am anymore.


I have to say, it was worth the wait.  And the wine.

Happy Wine Wednesday!  What are YOU drinking?

Wednesday, June 8, 2011

Deliciously Wine Wednesday.

A week or so ago, I was just home from work, minding my own business when BAM the lovely Rachel from In No Simple Language hits me with this delicious blondie recipe.

I mean, I was already feeling a bit exhausted and worn down from a long week and I just didn't have it in me to resist.

Plus, the 2 glasses of wine I'd consumed took down the rest of my defenses.

I know, it's a horrible Wine Wednesday picture. But this is real life, friends. I copy and paste recipes into word documents and sometimes highlight the ingredients as I go because I have been known to accidentally double ingredients.

I had to have them, immediately. Thank GOODNESS the ingredients were all in my cupboard.


The blondies were gone within 24 hours. HEAVENLY!

Also, I now know why all the dieters out there write that they HATE ME every time I post about food. I get it, friends. I get it.

Wednesday, May 11, 2011

Wordless Wednesday: Zucchini Pizza How-To


Wednesday, March 23, 2011

And Sarah Said: Let them Eat Cake (Balls)

After last week's cake ball post y'all BEGGED for a tutorial.... and apparently I had forgotten I posted one in 2009. Oops.

Tis neither here nor there.

Ok, here goes the cake ball tutorial. I stole my moves from Beach Bum & Baby, who actually makes cake pops. But those require sticks and I used to be a broke college graduate who didn't want to buy sticks so cake balls they became.

Everybody loves balls!

Step 1: Bake a cake. I use a boxed mix because it is easy and tastes amazing.

Let it cool, preferably overnight. Then slice it up into nice small pieces.


Step 2: Dump all those pieces into a mixing bowl. Add a scoop of frosting from a can from the grocery store. Mix mix mix.

Note: This batch actually turned out a bit over-mixed. It was too smooth. I actually prefer if there are still bits of dry cake mixed in. But to each her own.

Step 3: Use an awesome cookie scooper to make nice little balls on a cookie sheet. No need to space them apart because you won't be baking them.

Step 4: Pop that cookie sheet in the fridge for an hour or so. Tweet and watch TV.


Step 5: Time to get that chocolate ready! This is the most stressful part.

First of all, I know that Crisco is the devil's plaything but it is necessary for nice balls. Heh.

And the chocolate is actually "candy melt" which I purchase at either Hobby Lobby or JoAnn Fabric. The almond bark white chocolate you buy at Meijer does not work nearly as well. I've tried! And failed.

Ok, now that you've got the right ingredients.

Throw about half the candy melts into a microwave-safe container. Add a scoop of Crisco. No, I don't measure.

FOLLOW THE DIRECTIONS FOR MELTING. This crap burns so I usually use even less time than suggested. And stir, reheat. Repeat.

If you follow the pictures below, I actually didn't microwave between the 2nd and 3rd pics. Just stirred the crap out of it.


Step 95: Dunk your balls. I use a fork which results in imperfect cake balls but nobody cares by the time they are eating them.

See also: this picture is chronologically backwards. Try reading it from right to left. Like Arabic. See, I didn't mess up the pictures, I just arranged them in Arabic.

Booyah.

Step 99: Dump that bad boy from your fork back onto some waxed paper. I forgot to mention it above, but waxed paper is a gift from Jesus. Makes cleanup a breeze.

Step 100: Sprinkle immediately or they won't stick. That stuff hardens fast. (That's what she said.)

Put them in the fridge to harden and I bet you don't make it 15 minutes without consuming at least half the balls.

They're so delicious.

Go forth and cake pop. And mail me some while you're at it.

Tuesday, February 8, 2011

New Favorite Dinner Recipe

As I've blogged about before, I really dread dinner time. As much as I like to eat, cooking stresses me out.

Baking, not so much... but cooking really wears at my nerves.

A few weeks ago I found a recipe from Allrecipes.com called Brooklyn Girl's Penne Arrabiata. It's my new obsession.

It's easy even though it does have a few steps... but the leftovers are fantastic and I can usually make it with just the ingredients I have on hand.

All you do it bread some chicken breasts (dried bread crumbs, maybe a splash of onion and garlic powder) and fry them up in a pan with a bit of olive oil. Mmm.


Cook some pasta of your choice:
And make up a quick sauce. Mine has garlic, some red pepper flakes (I didn't measure yesterday and it was hot hot hot) a can of diced tomatoes with garlic and oregano, and a tiny can of tomato sauce.


And toss the whole thing together.


Seriously, this is delicious and it reheats perfectly. Maybe even better than the first time around.

So... it's 10 am and I'm already wondering what's for dinner today. Why does dinner stress me out so much?

Also, what are YOU having for dinner tonight?

Thursday, October 28, 2010

Cheesecake: Harder than It Looks

Soo... once upon a time I saw somebody tweet about making a pumpkin cheesecake from a Bethenny Frankel recipe.

Consider me sold.

So I went about making the recipe and it truthfully wasn't hard. Mix, mix, mix, done.

But then it came time to cook it. And I realized I no longer owned a springform pan that you're "supposed" to bake cheesecake in. Oops. No worries, used a cake pan instead.

But then the internet was all "turn down the temp on the oven" and "bake it in a water bath" and all this other stuff. And I got nervous. All these variables!

But I sent my cake off into the oven with high hopes. I did everything just like the internet told me to!

So much hope in that oven.

I let it bake and bake and cool forever....
Not gonna lie, I thought I had done pretty good. The top wasn't hard or crusty so I was feeling good.

And then I cut into it.
#bakingfail

Totally raw on the inside. Basically pumpkin cheesecake batter. (Which is delicious... but had been warmed in the oven and cooled on the counter for hours. Can you say salmonella?)

Therefore... I ate the top off the cheesecake and dumped the rest into the trash.

Such a waste of cream cheese.

I just don't think I have the "good cheesecake" gene in me.

Have any of you had success with a cheesecake? Or am I just functionally cheesecake challenged?

Tuesday, June 15, 2010

Delicious Bourbon Chicken

Remember back in April when I promised I'd post my homemade bourbon chicken recipe later that week?


Yeah, about that.

Better late than never, right?

Right.

Here we go.

First, brown up about a pound or two of chicken chopped into smallish pieces.

In a small mixing bowl or measuring cup, mix together the following:

1 clove garlic, crushed (I use the refrigerated pre-chopped stuff.)
1/4 teaspoon ginger
3/4 teaspoon crushed red pepper flakes (or less if you want less spicy)
1/4 cup apple juice (I've used other juices in a pinch)
1/3 cup light brown sugar (I use a lot less because I don't like too much sweetness)
2 tablespoons catsup (ketchup?)
1 tablespoon apple cider vinegar
1/2 cup water
1/3 cup reduced-sodium soy sauce
(Sometimes I add a squirt of mustard if I feel like it.)

Once the chicken is browned, dump the mixture over the chicken. Simmer on the stove for about 15-20 minutes.

I serve mine over rice.

(And it normally looks a lot browner than this... maybe I added a bunch of mustard to this batch? I don't remember.)

Either way, this is a fairly-easy and definitely tasty dinner.

And it's probably much healthier than the bourbon chicken I get at the mall.

Do you have any fun new recipes? My cooking is getting mighty boring...

 
Blog Design by Sweet Simplicity