Showing posts with label Crafting. Show all posts

Thursday, February 19, 2015

Long-Term DIY Projects

Back in October, I wrote a post about a craft project I was starting.  The thing is - I started it in FEBRUARY.  Of 2014.  Now, it's February of 2015.  (This is scintillating stuff, here.)

I have no ripped the buttons off at least twice, and then I sat and stared at it for approximately 3 months. 

Then I fixed the buttons and became paralyzed with trying to "finish" it with some text.


And after staring at it for hours, and many freak-outs with a fine-tipped paint brush... it's all finished.


Found the perfect spot for it, and I definitely don't notice the imperfections once it's hanging next to my favorite canvas.

One long-term DIY project to down.  Maybe I should consider tightening my timeframe down to the six-month mark instead of a YEAR next time.

Tuesday, October 7, 2014

Get Yo Craft On. Twice, Maybe Thrice.

We're gonna skip over the fact that I've dropped off of the blog planet and just act like I dropped off in the middle of a paragraph, ok?

And GO:

Way back a thousand years ago, when I was a young(er) newlywed and was consumed with creating The Perfect Home (bwahahahahaha) for my groom, I saw a craft on Pinterest and damn if I didn't want a piece of that action.

The original pic (below) has been re-posted and pinned a ton, and the original "post" I found links back to pinterest, so SOMEBODY out there came up with this genius idea.


I think, PERFECT, I can totally make that happen.  Cue act 1.  That started in FEBRUARY.  As in, 9 months ago.

If you are interested in killing yourself slowly, you can find buttons at JoAnn Fabrics, but, in my case, not Hobby Lobby.  They don't sell bulk packs.  (See, now you can say a blog taught you something today!)


I was proud because the start of this project was going so smoothly.  When it got to shaping the perfect heart, I very lightly traced out a heart... and then effed it the heck up.


I still can't figure out how it looked pretty before I started filling in the buttons... and then not pretty.  It was wonky.  Lopsided.  SAD.


Now, 9 months later.... I'm not sure it really looked that bad.  It looks symmetrical-enough to me...

And then, I re-did the damn thing last month.  This time, with 2 layers of buttons.


Guess what?  I broke my iPhone's camera (unrelated except for the horrible quality of this pic) AAAAND I still hate the damn heart.  Hate hate loathe.

In pictures I feel like I'm over-reacting... but in person, NOPE.

So now I'm debating if I want to start over AGAIN.

But I almost can't bear to rip it all off and re-start.  So instead it's been sitting on various tables around my house making my husband consider divorce.

Which is completely irrational.  Which I'm fairly sure is what he would say re-doing a craft project 3 times is... but then again, some would say it's art and you can't rush a masterpiece.

And masterpiece is loosely translated into "copying something from Pinterest."

The End.

Soo... start over?  I think the original picture shows they have a burlap/fabric heart underneath the buttons, which would TOTALLY help my wonky-heart problem.... except then I would have 4 wonky fabric hearts and have to choose one of them.  Paralyzing.

I've missed it around here.  Let's meet again soon, shall we?

Thursday, August 28, 2014

Ikea Tarva Hack

Waaay back in April, my BFF's and I journeyed to Ohio on an IKEA pilgrimage and I had been planning a little "Ikea hack" ever since.

I bought an Ikea Tarva dresser with the intention of turning it into a grand hutch for our kitchen... but of course the practicality of hacking a giant hutch with no construction experience..... yeah, no.

After I stared at the boxes for a solid month... my dad and I put it together with a minimum of swearing.


The first thing we noticed, which you can see in the picture below, is that the drawers are ever-so-slightly wonky.  Like... the gap in the middle of the 2 sets of drawers are just off.


My dad, handyman extraordinaire, determines that this will ruin my whole project.  I am not deterred.

So we get to cutting out some trim to snazz the Tarva up.


Many hours later (like 3), things are looking good.  
 

We get the whole piece trimmed out, including the sides.  And miraculously, the trim seems to have magically evened everything out.  No weird gaps, it looks pretty perfect.


Miracles do happen!  Even IKEA miracles.

Four layers of stain, 3 layers of paint, and approximately 8 layers of polyurethane later... things were starting to get real.


Hallelujah!  Hallelujah!!  The only thing better than dreaming up an Ikea project is FINISHING it. 


It's not so much a "kitchen hutch" as I had planned... but it's actually holding overflow baking supplies, and I just loooove to kick my shoes off underneath it after a long day.  Which is really classy and totally Pinterest-worthy. 


Bam.  Nothing like a good transformation to make me want to do it all again!


Now... I can't understand why my husband doesn't want to make an Ikea trip and start on another project together.

I mean.... it looks pretty amazing, right?  We won't go into some of the "little tweaks" I want to make to it. 

Friday, August 16, 2013

DIY 4-Ever

Back in May, during Garage Sale time, we unearthed a kitchen table from the attic.  Seeing as how Mr. RH and I nave a brand-new apartment with very little furniture inside.... I was still hesitant. It was just so.... country kitchen.  


So I decided I was going to re-finish said table.  After much MUCH hemming and hawing, I decided to just paint the table legs a similar creamy-ivory color, and to stain the top darker. 

So I sanded.  And then I sanded some more.  Thank the Lord for my little electric, handheld sander. 

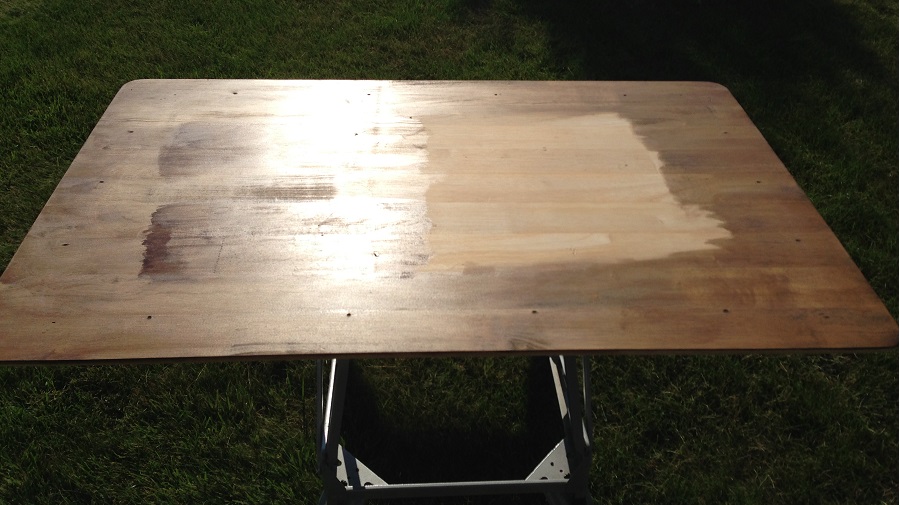
Afterwards, I applied my first layer of stain.  


I'm not sure if you can see it or not... but it was a disaster.   I let the tabletop sit in our back porch for a few weeks... and then I knew it had to change. 

So I started over.  Sanded it alll the way back down to bare wood.

Meanwhile, I worked on the base inside due to crazy humidity levels.  Make it work!


After all that sanding, I did a little more testing of stains... on the bottom of the table.  And then I ended up mixing my own on the fly and all the testing was for naught.  TYPICAL. 


In the end.... I think my stain-mixing wildness paid off.  A perfect, mid-brown stain.  Ahh, much better.


The humidity outside increased again... so it was back inside to apply varnish to the tabletop.  The pic below is after two layers.... my dad said it needed more like 3 or possibly four layers.


As per usual, I may have overdone things a wee bit.... but it actually really paid off.  Six layers of varnish later - that tabletop is as smooth as glass.  


I cannot wait to get that baby into our new apartment.... which we got the keys for yesterday.

More details on that to come!

As for me... I'll be busy crafting.  Centerpieces don't make themselves!


 Have a fabulous weekend!

Friday, March 29, 2013

Crafting. Check Check.

Remember back in January, when I had the most epic craft fail of 2013

Inspired by the shower I threw for Mr. RH's sister, I was inspired to create initials canvases for Mr. RH and myself.

My first attempt was good, until I accidentally jostled all the buttons and thought I could salvage it.  I couldn't.

So bad, man.  So so so bad. I love how the B looks squished and the S is allll stretched and jacked up.


 This time, I used a big, printed stencil to trace the letters onto the canvas.  Worked much better.


I then added some faux-nailhead trim around  the entire thing.  I've actually had the letters done for a while, but I couldn't figure out how to do the trim in a way that was nice and even.

And then I got out a ruler and measured it.


Duh.   I can be a little slow sometimes.

All in all, I'm pretty dang thrilled with how they turned out.  Can't wait to hang them at Mr. RH's apartment.  Gotta mark my territory, ya know?

Hope everyone has a fabulous weekend with friends, family, and tons of candy.

Friday, January 25, 2013

First Craft Fail of 2013

So, if you might remember, I went craft crazy in November for Mr. RH's sister's baby shower.

I posted this pic before, and of course I don't have a better one, but I've been obsessed with the canvas (that I circled in yellow below) since I made it.  


Right after the shower, I decided that Mr. RH and I needed canvases like those to decorate with.  Have I mentioned that I still have a picture I started painting last April that isn't hung above Mr. RH's bed yet?  Yeah.

Anyways, we needed initial canvases.

So, over the past 2 months I've been playing with these canvases.  I put the buttons on once at least 3 weeks ago... and I just wasn't sure I was digging the aqua color mixed in with the blue.


So I dumped them off and tried again from Mr. RH's couch during a TV-marathon.  I got them looking really good...


... and then I bumped the dang canvas when I went to the bathroom.   Ruined my masterpiece!

So I quickly decided to just glue them down... big mistake.


This is the canvases as of this morning (above).  What happened to that S?  It is so jacked up.

And then the B is quite squished.  And much smaller than the S. 

Alone, I don't think that they're a disaster... but together, can you say hot mess?

Luckily, I only used Elmer's glue.  I'm thinking I can pry the whole mess apart, rip the canvas off and start fresh, and maybe use a stencil next time.

Why didn't these ones turn out like the gorgeous shower gift above?

First fail of 2013's on the books.  Let's hope the wedding crafting goes a little more smoothly.

Dear God I hope.


Thursday, November 15, 2012

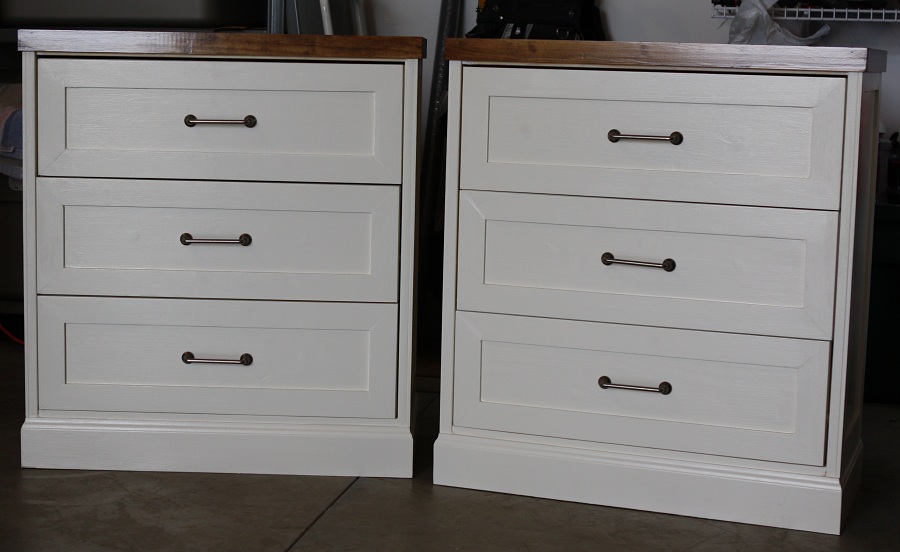
Nightstand Redo (an IKEA Rast Hack)

A couple of months ago, I became enraged that Mr. RH didn't have a nightstand next to his bed.  Not even a table or anything.

Myself, I can't live without a nice table next to my bed with at least 2 drawers in it.  Plenty of room for all of my nighttime essentials.  Ibuprofen and allergy meds and chapstick and at least 6 different types of lotions. 

So, I found myself seeking out nightstands anywhere I went.  Target, TJ Maxx, random other places.... no dice.

But then there was the trip to IKEA.  Three months ago, no big deal.

And then an amazing Rast Hack tutorial from A Charming Nest

And then, of course, I convinced my dad to help.

First I put the IKEA pieces together.  Boring but necessary.  Letting them sit in the garage for a week or two is optional.


Next up, deciding what size of trim the piece should have.  Who knew 1/4 of an inch would make SUCH A BIG DIFFERENCE?!  Difference?  Negligible, in the end.


Then there was the testing of stains.  How in the heck are you supposed to know what stain is going to look like?!  Also, stain is scary and dangerous.  


My dad borrowed a fancy saw from a friend... and we then spent an entire morning sawing.  I sawed at least 5 pieces. 


The hardest part of cutting all the trim was making sure I didn't accidentally cut a long piece into a short one thinking it was scrap.  There was a lot of stacking and counting and re-stacking of trim pieces.


Then there was the varnishing of the top piece.... let's just say I'm not so familiar with varnish.

The hardest part for me was putting on the drawer pulls straight.. and if you can spot it, I may have messed up once... fortunately, my dad fixed this a couple of days later.


So, if you're thinking that you can't do a major IKEA overhaul on your own... you may be correct.  It actually ended up costing me quite a pretty penny to complete the project.

$40 each for the night stands.
$21 for paint, stain, and varnish.
$22 for the wood piece we used on the top.
$15 for drawer pulls.
$10 for disposable gloves used for staining.
$10 for moulding for the base of the piece.

And of course I'm missing the receipt for the trim which was probably the most expensive thing... bringing us to at least $80 per night stand.


Can't say I'm sad with the finished project though.  Now if only Mr. RH didn't view them as a major imposition on his daily life.  Apparently they're blocking his zen or something.  

Men.

Feel free to tell me how impressive the transformation is.  My favorite thing to do as of late is to go visit them at Mr. RH's apartment when he's not home.  They miss me, I can tell.

Tuesday, June 19, 2012

I Bunted. No Kidding.

So, if you had asked me 6 months ago what "bunting" is... I would have told you that I make an excellent bundt cake.  (Side note: why does my computer not recognize "bundt" as a word?)

So, naturally, bunting is the act of eating some really delicious bundt cake.  Or not, whatever.  You people and your grasp of the English language, whatever.

Anyway, someone told me what bunting is.  Those cute little flag banners that wave in the breeze and make everything look homespun but also very chic.

Image from 8balloons.com

So, a couple of weeks ago, when talking to my co-worker about a bridal shower, I decided I needed to conquer the bunting beast.

The original ideas I saw all involved burlap.  Side note: Hobby Lobby doesn't sell burlap.  At least not in the fabric department, and I couldn't find it and I was quite distressed.

So I got some cheap canvas instead.... and it worked perfectly.

First order of business: find a bunting template on the internet, print, and cut the fabric.  I can't find the one I used any more, of course.

 Then I freaked that the canvas was too light and neat looking.  Panic panic panic.

And then I remembered tea-staining.  Make a couple gallons of piping hot tea on the stove, dump my little pennants inside, and wait.  The original color is on the right, final color in the middle.  BAM.


It took forever for them to dry because it was freezing out that day... so I ended up ironing them dry.  It helped to have a nice, pressed surface in the end when I did the painting, so it all worked out.


I used some cheap, black acrylic paint that was gathering dust in my closet and stenciled the letters onto the pennants.  I broke down and bought stencils at Hobby Lobby... they ended up being the most expensive thing about the project, probably $8-9 before the coupon.

  The Bride's New Last Name

 I used a hot glue gun to attach the pennants to the string, but ended up making it so the letters aren't stationary - you can move them to the left and right. 

I figured she might be able to reuse it someday, or even for the wedding, so I wanted it to be as easy to modify as possible.


I'm really pleased with how it turned out, and everyone was asking about it at the shower.

It's been a loong time since I flexed an even semi-crafty muscle.  It felt good, real good.

So, bunting.  No longer the act of eating bundt cake.  Sad day, really.

Tuesday, April 10, 2012

Naturally, I'm an Artist

Yesterday, I mentioned that Mr. RH had moved into a new apartment.  Which, in my mind, meant one thing: sweet, let's buy some new crap to decorate.

About 30 seconds after I spent my whole paycheck at Target (what, you'd do it too!), I realized that I had to slow my roll.  Not to mention, Mr. RH was somewhat less amused at the mounds of crap I was toting into the place (usually while he wasn't home, duh I'm not stupid).

So then I remember that, in college, I was quite the budding artist.  And by "quite" I mean "not at all."

I decided that I wanted to paint some fun canvases to decorate the big, white walls of Mr. RH's new place.  So, of course, I went Hobby Lobby crazy.  Damn if I can't walk into there without spending $50 on crap I wasn't even looking for.

After a while, I had a bunch of blank canvases piled up in my bedroom... so I decided it was time to take action.

I had seen some cute pictures of multi-canvas pictures that looked really cool... and decided that was my plan.  Of course, Mr. RH didn't like the giant puffy-glitter heart I had in mind... so I decided that some manly tree was the way to go.

So.... I drew my branches.

Immediate response in my head: damn, I'm an artist!  Second response: crap, what next?

Next step:  leaves, cause they're manly.  Ehh, let's add flowers while we're at it.

Thought: um, this tree is quite sparse and that's a lot of empty blue canvas.

Hey, let's just add more branches.  Like, everywhere.


PANIC PANIC, what have I done this looks like crap!

Oh wait, just add more flowers. They fix everything.

Well crap, now how did my manly tree painting turn out?  Hmm, everything is starting to smear, let's let it dry a bit before we finish.

Cut to present day, 14 days later.  Still haven't finished the damn thing, STORY OF MY LIFE.

80% is the new 100% finished, RIGHT?

Am I the only one who can't finish a craft to save my life?  Mostly because I'm afraid?

Tell me I'm not the only one.

Hold me, I need to finish this damn thing cause it's stressing me out.

Wednesday, October 13, 2010

Craft Failure.

You know... the crafting project seems to be a complete disaster... but you know, at least I have a lovely photo to remember my failure by.


Thursday, October 7, 2010

Epic Craft Fail. And Real Housewives. A Natural Pair.

Remember my craft project?? The one I couldn't stop yapping about?

Big fail. Huge. I totally screwed this one up.

But no worries I am regrouping and WILL figure out this project if it kills me. Which it very well might.

----------------------------

Yesterday at work was one of those days. From the get-go things just went south. And by 8 pm (I worked till 9:30) I was (on the inside) a puddle on the floor crying and sobbing and being a baby. Except I was working with 6 other girls and that wasn't an option... so I sucked it up and held myself together and instead woke up at 5 am today with MASSIVE anxiety.

Sometimes you just really want a hug from your mom, you know?

I know it'll get better. Deep breath. Also... working 5 days in a row isn't all it's cracked up to be. (Reminder: today, Thursday, is only day 4. Lord help us tomorrow.)

----------------------

Also, have I posted about Real Housewives of DC yet?

So. Here's the thing.

I was going to write this post all yappy-yappy saying this: Hey Andy Cohen: the secret to the success of the RH franchise is that you need me to LIKE somebody on your show. Either because I can identify with her struggles or because she's all-around likeable or tells it like it is - SOMETHING.

Do you all remember Lori from OC?? Gosh, those were the DAYS! She wasn't a perfect parent - and she had real struggles. Her teenage son was addicted to drugs for goodness sake!

And yet - I couldn't help rooting for her. Couldn't help WEEPING as she married her sweet-as-sugar new husband. Who clearly adores her. And couldn't help weeping when she left because zomg miss her so much.

So... I was pissed about DC. Pissed that they're all kinda snarky and unlikeable. But then they talked about Stacy's search for her biological dad and Mary's struggles as a mom and even unlikeable (she is) Cat's friend's death. And then my cold, black heart started to crack and now I'm addicted, ok?

So Andy Cohen... feel free to tell me to shove it. I was wrong. Patience is a virtue.

However, in future seasons you might think about doing some of the sap up front. I want to like the people I love to hate, ok?

Hugs and kisses,
Sarah

----------------------------

Gosh, I'm so glad I got that off my chest.

Have a fabulous Thursday!


Blog Design by Sweet Simplicity